Automate IIF File uploads and data extraction with Power Automate and SharePoint

In this blog post, we’ll walk through how to manually upload an Intuit Interchange Format (IIF) file to a SharePoint document library and automatically parse its contents to create list items in a SharePoint list using Power Automate. This can be especially useful when working with QuickBooks for data exports.
Scenario Overview
1. Manually upload an IIF file to a SharePoint document library.
2. Trigger a Power Automate flow when the file is uploaded.
3. Read and parse the file content.
4. Extract relevant data (e.g., transaction details).
5. Create items in a SharePoint list based on the data.
Step 1: Set Up SharePoint Library and List
Document Library
1. Create a new library (e.g., "Time Tracker Excel Docs").
2. Assume we are uploading the file contains the values for the below fields,
3. Based on the above fields, create a necessary column in SharePoint list." Include Column Name along with type of column.
SharePoint List
1. Create a new SharePoint list (e.g., "IIF Uploads Data").
2. Define necessary columns like:
Step 2: Uploading the IIF File
1. Users to manually upload .iif files to the “Time Tracker Excel Docs” library.
2. Example file name (e.g., Invoices_2025.iif).
Step 3: Create Power Automate Flow
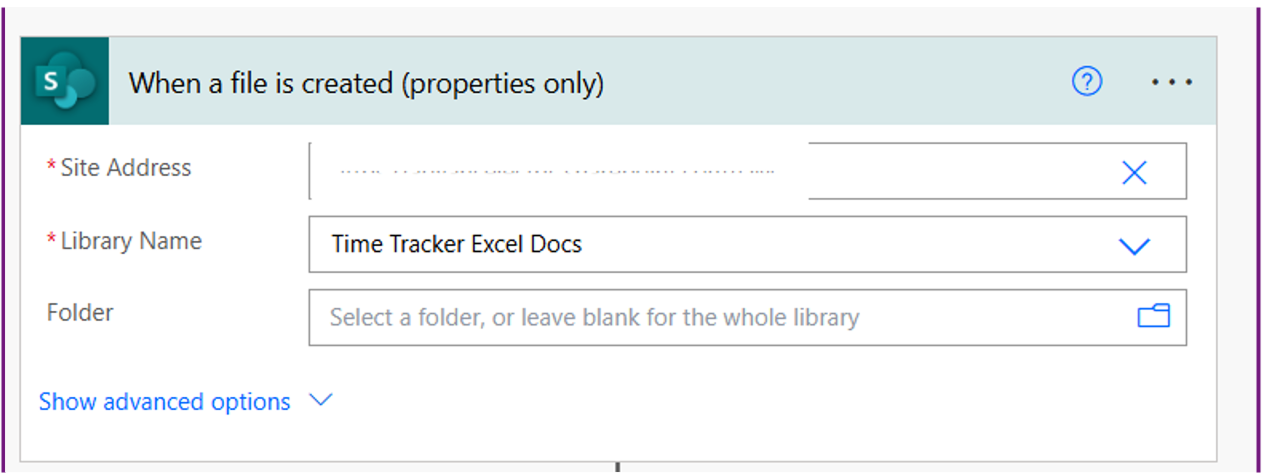
1. Trigger Action
Use “When a file is created (properties only)” to trigger the document library.
2. Get File Content

3. Convert File Content from Base64 to String

4. Remove Header from IIF File Content
When working with .IIF files, the first line typically contains column headers (starting with !NAME, !TYPE, !Date, !ACCNT, !AMOUNT). We need to skip this header so we can process only the data rows.

Example: If your IIF file content looks like this:
!NAME TYPE DATE ACCNT AMOUNT
TRNS CHECK 4/23/2025 Bank -200
SPL CHECK 4/23/2025 Office Supplies 200
After using the expression, it becomes:
TRNS CHECK 4/23/2025 Bank -200
SPL CHECK 4/23/2025 Office Supplies 200
5. Convert IIF File Line to Array by Adding Comma Separators
Since the CSV file already contains comma separated, ignore this step. However, the IIF file uses tab delimited formatting, so we manually added a step in the flow to replace tab characters (\t) into commas and then split the line into an array of values.
Original iif file output: TRNS CHECK 4/23/2025 Bank –200
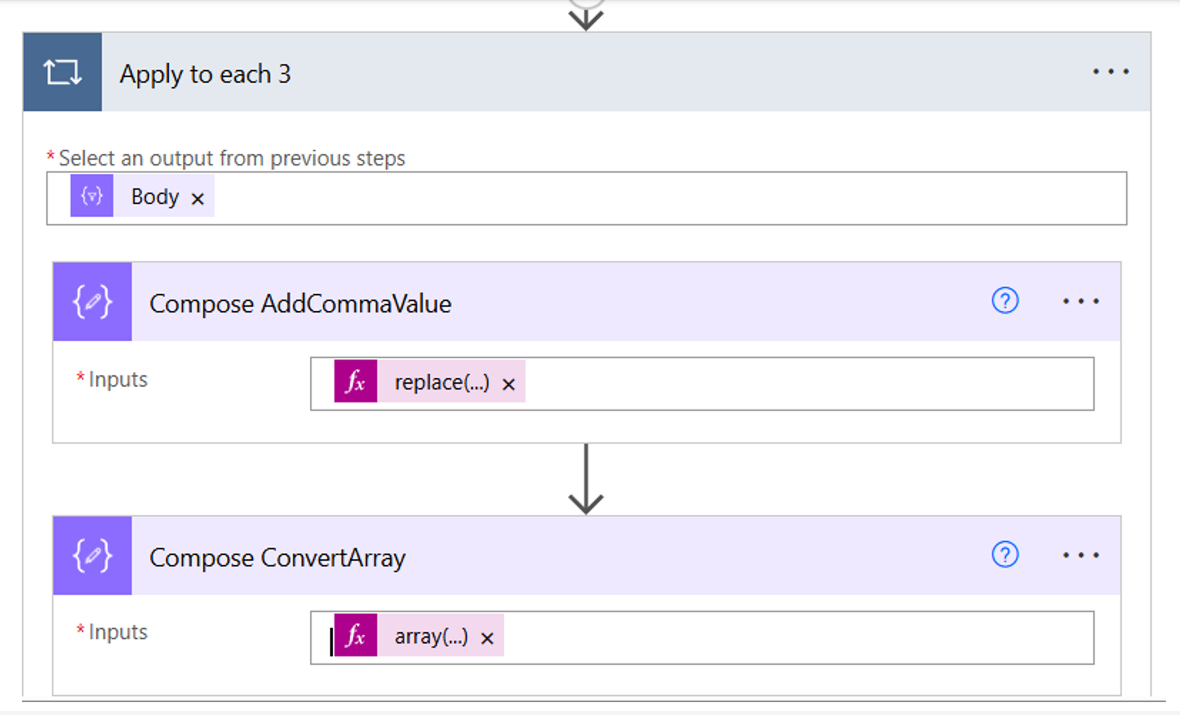
6. Apply to Each
7. Replace Tabs with Commas
Explain the Expression:
a. item() refers to the current line in the loop.
b. decodeUriComponent('%09') decodes the tab character.
c. replace(...) swaps tabs (\t) with commas (,) to make the line CSV-like.
d. For example, after adding the commas, the line becomes: TRNS,CHECK,4/23/2025,Bank,-200
8. Convert Line to Array
9. Create SharePoint List Item
Example:
a. Name: split(item(), '\t')[0]
b. Type: split(item(), '\t')[1]
c. Date : split(item(), '\t')[2]
After setting up the workflow, uploading a file to Time Tracker Excel Docs triggers the flow. If the file does not match the expected format:
Conclusion
Parsing .iif files and creating SharePoint list items using Power Automate is a practical example of how automation can save time and reduce manual data entry errors. With
proper handling of file structure and error management, you can easily streamline your QuickBooks-related workflows.


Comments
Post a Comment